Powered by Blogger.
Showing posts with label Cheese. Show all posts

Thursday, July 26, 2012

Southern Tomato Pie


Last summer, I continually saw people posting about making tomato pies on Facebook.  I had never heard of the tomato pie, but found quickly that it seemed to be a southern thing, and growing up in California wasn't conducive to being exposed to true southern cooking.  I was curious, but the summer got away from me, and I never made one.  I finally got around to it last week, and I'm devastated that I waited this long!  This pie is relatively easy to make and packs a punch with flavor.  My husband said that the flavors reminded him of pizza, and no wonder: it's basically tomatoes, cheese, and herbs in a pie form.  Make this with the freshest tomatoes possible--straight from the vine and sun-warmed.  In a pinch, you can use a premade pie crust, but this crust from Alice Waters has never disappointed me.  It's simple to make and turns out flaky and delicious.  And the rest is really up to you.  I could imagine that this would be delicious with some caramelized onions thrown into the mix.  Change your herbs or types of cheese.  Add a little crispy bacon to the top.  I've even seen it around the interwebs with corn added.  Whatever you do, go make this now.  It's a scrumptious southern treat!

Southern Tomato Pie
Makes one pie/tart


Tart crust
From Alice Waters' The Art of Simple Food: Notes, Lessons, and Recipes from a Delicious Revolution
2 cups all-purpose flour
1/2 tsp Kosher salt
12 Tbl cold unsalted butter, cut into small cubes
1/2 cup ice cold water

Tomato Pie
4 ripe tomatoes, peeled and sliced
1/2 cup green onions, sliced
1/4 cup basil, roughly chopped
3/4 cup mayo
1/4 cup sour cream
1 cup sharp cheddar cheese, grated
8 ounces ball mozzarella cheese, diced or grated

To Make the Crust:
Combine the flour, salt and butter in your stand mixer.  Mix for about 60 seconds with your paddle attachment.  Add about 3/4 of the water and mix until the dough comes together. (This takes about 30 seconds in the mixer.)  Add more water, little by little, if needed.  Separate the dough into 2 disks, wrap each in plastic, and refrigerate for at least an hour.  You'll only need one for this recipe, but you can freeze the second for a later use.

Once it's been refrigerated, take out of the refrigerator and let rest on the counter for about 20 minutes.  Roll out on a floured surface until it's big enough to fit in your tart or pie pan.  Place in the pan and fold the edges over to create a thicker crust (or you could just trim the excess). Place foil in the crust and fill with dried beans or rice.  Bake at 375 degrees for 15 minutes.  Remove the weights and foil and bake for another 5-7 minutes or until the crust is golden brown.  Let cool on your countertop.

To Make the Tart:
Preheat your oven to 350 degrees.

Lay your tomato slices in a single layer in a colander and sprinkle with a little salt.  Let sit for about 10 minutes.  While they are draining, combine the mayo, sour cream, cheddar cheese and mozzarella in a bowl.  Place the tomatoes on a layer of paper towels and cover with another layer and let sit for about 5 minutes.(This will help prevent your pie from being soggy.  If your tomatoes are extra juicy, feel free to replace the wet paper towels with dry ones and cover again for another 5 minutes.)

Place one layer of tomatoes in the pie/tart tin.  Sprinkle with about 1/2 of the green onions and basil.  Layer with the rest of the tomatoes and green onions and basil.  Spread the mayo/cheese mixture over the tomatoes.  Bake for about 30-40 minutes or until the pie begins become golden.  If after 40 minutes, the top isn't completely golden, place under the broiler until the top is browned and bubbly.  Let cool slightly, but serve warm.


 Subscribe to free updates from The World in My Kitchen


Read more...

Friday, April 20, 2012

Green Chile Enchiladas

***Don't forget to enter my giveaway for 7 two 7 glass garden markers! The contest ends on Friday, April 27th.


The other day I was telling someone that cooking Mexican food comes naturally to me.  I think it was growing up in Southern California that did it.  Mexican food was a staple in my diet growing up, and then living in San Diego during and after college just solidified those flavors in my head.  I know that different regions of Mexico offer different dishes and flavors, so I'm just calling my recipes the SoCal version of Mexican food.  :-)


Enchiladas are one of my favorite foods, period.  I don't remember learning how to make them...it's just stuck in my head as a recipe.  Basically a filled corn tortilla smothered in chili sauce and cheese and then baked, it's Mexican comfort food at its finest.  The stuffing variations are endless, but my favorite is seasoned chicken with pepperjack cheese--spicy and filling and luscious all rolled into a corn tortilla...yum!

Green Chile Enchiladas
Serves 6 (at least!)

Cook's Note: This is more of a method than a recipe.  Feel free to play with your fillings or leave the meat out for a vegetarian version.  This recipe also freezes well.  Just wrap well in foil and then bake a few minutes longer straight from the freezer.  (Be careful if using a glass pan--it could crack if placed in the oven straight from the freezer.  If using glass, let the enchiladas thaw a little before baking.)


2 small chicken breasts, about a pound's worth
1 bottle of beer
1/2 tsp ground cumin
1/2 tsp paprika
1/2 tsp chili powder
1/4 tsp Kosher salt
A couple of grinds of pepper
1/2 of a large block of pepperjack cheese, shredded
Corn tortillas
1 large can of green enchilada sauce (found in the Mexican aisle of your grocery store)

Place the chicken breasts in a saucepan.  Add the bottle of beer and add enough water to cover the chicken by a couple of inches.  Heat to a simmer and cook until the breasts are completely cooked through, about 10-20 minutes.  Remove the breasts from the liquid and set aside to cool.  Once cooled, shred the chicken using your fingers or two forks.  Add the cumin, paprika, chili powder, salt and pepper and mix to combine.

Preheat the oven to 350 degrees F.

Heat the tortillas in the microwave between a damp towel just until heated through, about 30 seconds.  Remove from the microwave, taking care not to burn yourself, and set aside.  Pour the enchilada sauce in a wide-mouthed bowl.  One by one, dip the tortilla into the sauce until completely covered.  Let the excess drip off into the bowl and then place the tortilla into your baking dish.  Spread about one tablespoon of chicken in a straight line across the middle of the tortilla.  Add about a tablespoon of cheese, and then roll the tortilla.  (The tortilla might rip a little.  This is okay.)  Push against the edge of the baking dish and then repeat with the rest of the tortillas until you can't fit any more. Pour about a half of a cup to a cup of the remaining enchilada sauce over the top of the enchiladas, until all enchiladas are lightly coated.  Sprinkle with pepperjack cheese.

Place the enchiladas on the middle rack in the oven.  Bake for about 20-30 minutes, or until the cheese is bubbly and starting to get golden brown.  Remove from the oven and let rest for about 10-15 minutes. 

Serve with sour cream and/or guacamole.

 Subscribe to free updates from The World in My Kitchen


Read more...

Tuesday, April 3, 2012

Summery Taco Salad


I always look forward to the warm weather of the spring and summer, not only because I grew up in the desert of southern California, but also because meals become simpler.  Although I enjoy the comfort foods of winter, summer cooking steals my heart.  I love the simplicity of what you can do with fresh ingredients--throwing together a salad is one of the simplest and freshest ways of cooking in my book.  I was excited last week, then, when my husband requested the first salad-as-a-meal of the year--taco salad.  This is the salad I grew up eating, and although I've changed up the ingredients somewhat, it's really my mom's recipe.  Thanks, Mom!

Taco Salad
Serves 4-6
Cook's Note: This is more of a guide than a flatout recipe.  Don't like ground beef?  Use chicken!  Do you have some fresh veggies from the garden?  Throw them in!  You get the idea... :-)

1 pound ground beef
1 tablespoon of your favorite taco seasonings (I use Penzey's Bold Taco.)
1 teaspoon salt
1/2 teaspoon pepper
6-8 cups of your favorite lettuce
1 tomato, chopped
1/4 cup diced red onion
1 avocado, chopped
1 can red kidney beans, drained and rinsed
1/2-1 cup pepperjack cheese

For toppings:
Crushed tortilla chips
Sour cream
Salsa

Cook the ground beef along with the taco seasoning, salt and pepper until well browned.  Strain the grease and set the ground beef aside in a bowl lined with paper towels to cool.

In a large bowl, combine the lettuce, tomato, red onion, avocado, kidney beans and cheese.  Place a serving of salad in a wide bowl and top with a handful of ground beef and crushed tortilla chips.  Dollop a bit of sour cream and some salsa on top, and mix until the salad is covered with the dressing.

Serve immediately.

 Subscribe to free updates from The World in My Kitchen


Read more...

Thursday, February 23, 2012

Herbed Flatbread Pizza with Arugula, Sundried Tomato and Ricotta Salata


Earlier this week, I promised to tell you what I did with the flatbread I made for the Secret Recipe Club...and here it is!  It's based on a pizza that I absolutely loved to eat when I lived in Strasbourg, and I've
always wanted to recreate it.  When the bread came off of the grill, I realized that I had most of the ingredients in my kitchen to make it, so I did!  The one thing that was missing was actual truffles, but I did have some truffle oil that I sprinkled on top, and I think that did the trick without putting me into debt!  :-)

If you've never had salad on a pizza, you're missing out.  It's refreshing and filling at the same time...and only takes a few minutes to prepare.  This would really be a perfect light dinner or lunch during the hot summer months when making pizza in your oven sounds like a form of torture.

Herbed Flatbread Pizza with Arugula, Sundried Tomato and Ricotta Salata
Serves 1
Cook's Notes: If you don't have truffles or truffle oil, you can always substitute a little of the sundried tomato oil for the truffle oil to add a little more flavor.


1 portion of flatbread
1 cup arugula
1-2 tablespoons sundried tomatoes in oil, drained and chopped
1/8 cup ricotta salata, shredded
Salt and pepper, to taste
Olive oil
Balsamic vinegar
Truffle oil, optional
Fresh parmesan cheese

If your flatbread is not fresh off the grill, place it under the broiler for a few minutes to warm up and crisp slightly.  Remove to a plate.

In a bowl, toss the arugula, sundried tomatoes, and ricotta salata.  Add salt and pepper to taste.  Sprinkle with a little balsamic vinegar and olive oil and toss to coat lightly. 

Place the salad on top of the flatbread and sprinkle a few drops of truffle oil and shred a little bit of parmesan cheese over the top.    Cut into manageable portions and enjoy!

 Subscribe to free updates from The World in My Kitchen


Read more...

Tuesday, January 3, 2012

[Guest Post] Broccoli Cheddar Soup


Today is the first in my series of guest posts while I am traveling with my husband and 16 college students in Europe.  I'd like to introduce you to my first guest blogger: Danielle at A Day in the Life.  Her blog focuses on her life as a mother, travel, crafts, and most of all...food!  Go check her blog out and read on for her post about Broccoli Cheddar Soup!

**********

A few months ago, I posted about a group I had proudly become a part of, the Kentucky Food Bloggers. One of the creators of this group, Mindy, helped organize our first outing in conjunction with the Incredible Food Show and did an incredible job, I might add. When she asked for help filling in the blanks while she went overseas, I jumped at the opportunity to help!

Perfect for the cold months ahead, Mindy decided to steer her guest posters in the direction of warm soups. There's nothing that sounds more enticing to me in the winter than a warm bowl of soup. I'm more of the wholesome, throw-as-many-vegetables-in-as-you-can type of soup lover but I try not to discriminate.

One of my favorite food blogs is Annie's Eats because I've loved everything I've ever made from her site. Batting a thousand at any one site is practically unheard of for me, but with Annie I feel fairly confident that if she liked it, I will too.

I have had her Broccoli Cheddar Soup bookmarked for quite some time, but because neither of my boys' young stomachs were able to tolerate broccoli, I haven’t had the chance to try it. Well, now that I have graduated from being their sole source of nourishment, I practically crave broccoli after going without it for so long. This was the perfect opportunity for me to get to try this recipe.

This is such a wholesome and delicious soup! I enjoyed how you could taste so many various flavors in every bite. The broccoli was certainly present, as were the richness of the butter and the creaminess of the sharp cheddar. With broccoli having a rather pungent flavor, the sharpness of the cheese really helped to cut that and make it a very mild tasting soup.

The only thing I might consider doing differently next time would be to let the cheese sauce get a little thicker, or add less chicken stock. In all fairness, I didn't actually measure the chicken stock before pouring it in, so I might have been a little heavy handed in my pouring. The flavor is so good though--it really doesn't matter what the consistency is, you'll still want to lick the bowl!

I hope you enjoy and I hope you'll visit me at A Day in the Life. Happy and safe travels, Mindy!
Broccoli Cheddar Soup
Source: Annie's Eats 

Ingredients:
6 tbsp. butter, divided
¾ cup onion, chopped
1 cup carrot, chopped or shredded
4 cups small broccoli florets
3 cups low-sodium chicken broth
½ tsp. onion salt
½ tsp. garlic powder
4 tbsp. flour
2 cups milk (I used a combination of skim and almond milk)
2 cups shredded sharp cheddar cheese
Freshly ground black pepper and salt to taste

Directions:
In a large stockpot or Dutch oven, melt 2 tablespoons of butter over medium heat. Add the onion to the pan and sauté until tender, about 5-7 minutes. Add the carrots to the pan and cook a couple minutes more. Stir in the broccoli, chicken broth, onion salt and garlic powder. Bring the mixture to a boil, then reduce the heat to a simmer.

In a medium saucepan, melt remaining butter. Add the flour and cook for 1-2 minutes until golden brown, whisking constantly. Whisk in the milk and cook until the mixture thickens and bubbles, about 5 minutes. Once the mixture has thickened, whisk in the cheese until completely melted. Remove from the heat and add the cheese sauce to the soup pot. Allow to simmer until warmed through and broccoli is tender. Season with salt and freshly ground pepper to taste. If desired, puree the soup with an immersion blender for a smooth texture.
Photo courtesy of the guest author.

 Subscribe to free updates from The World in My Kitchen


Read more...

Monday, October 3, 2011

Butternut Squash Risotto


Butternut squash is one of those ingredients that I'm learning to love.  I've never liked squash in general (as I've mentioned a thousand times on this blog), but since I get them from my CSA, I have always felt an obligation to keep trying the different squashes so I don't waste what we're given.  Last year, I came up with a soup that my husband and I love and then I froze the rest to be used in quick breads in lieu of pumpkin. 

Last week we received our first butternut squash, and I struggled to suppress a groan.  I know, I know, I'm crazy, but I just haven't been feeling creative in the kitchen over the past couple of weeks.  The slump is due to my crazy busy life, I know, but just thinking about figuring out what to do with the squash was exhausting.  Then inspiration struck...I was going to make some risotto!  I have about ten different rices in my cupboard, and had just been thinking about how to get them into my repertoire more often when the butternut squash crisis happened.

And that's how a delicious recipe and side dish was born out of the ashes of my worn-down self.  Make it...you won't be disappointed!

Butternut Squash Risotto


Butternut squash "puree":
1 medium butternut squash, quartered into wedges and seeded
3-4 sage leaves, chopped
1/2 tsp Kosher salt
1/4 tsp pepper
Olive oil

Rice:
1 Tbl unsalted butter
1 Tbl olive oil
1/2 medium onion, diced
2 cups arborio rice
3 sage leaves, chopped finely
1/2 cup dry white wine
4 cups chicken stock
Butternut squash puree from one medium squash
4 Tbl grated parmesan cheese, plus extra for garnish
Salt and Pepper, to taste

To make the butternut squash "puree":
Preheat the oven to 400 degrees F.  Lay the butternut squash wedges in a rimmed baking sheet, skin side down.  Sprinkle the flesh with the sage, salt and pepper.  Drizzle a little olive oil over the squash, and using a pastry brush, brush the oil all over the flesh so that it's completely coated.  Place in the oven and bake for 30-50 minutes or until the flesh is soft.

When the squash is cooked, remove from the oven and allow to cool slightly.  Scoop out the flesh into a bowl and smash with the back of a fork until it is broken down.  There should be some chunks left.  Set aside.

To make the risotto:
Heat the chicken stock in a saucepan until just simmering.  In a larger pot, heat the butter and oil over medium heat until the butter is melted.  Add the onions and saute until the onions start to wilt, about 5-10 minutes.  Add the rice and sage and stir to coat with oil.  Saute, stirring often, for a couple of minutes, or until the rice starts to become translucent.  Add the wine, stirring constantly until the wine is almost completely absorbed.  Add 1/2 cup chicken stock and stir until it's almost completely absorbed.  Continue adding chicken stock, 1/2 cup at a time, until the stock is used up or until your rice is done.  (Risotto should be done "al dente," which means that there should be some chewiness to the rice.  It should not get mushy.)  If you use up all of the stock and the rice is not completely done, add a little hot water until it is done. 

Add the butternut squash "puree" and parmesan cheese to the rice.  Stir well and taste.  Add salt and pepper to taste.  Serve hot with a sprinkling of parmesan.

 Subscribe to free updates from The World in My Kitchen


Read more...

Wednesday, September 14, 2011

Zucchini Ribbon Salad with Feta and Oregano


This is the time of year that my family and I dread: zucchini season.  You'd think we were allergic to the stuff because none of us like it except for in baked goods.  I get a ton of them in my CSA shares, and I hate for anything to go to waste, so I've been subjecting my kids and husband to zucchini recipe after recipe...and I think I finally found a winner!

I've seen zucchini ribbon salads floating around the internet this season, so I decided to try my hand at one.  I thought that the thin slices would help the family over our zucchini texture issue, and I was right!  I found fresh oregano at the farmer's market for a buck and decided to add that along with the sharp salty flavor of feta cheese.  I'll definitely be making this again as everyone had seconds...and someone who shall remain nameless had a healthy portion of thirds.  :-)

Just as a note for next time: although the ribbons are beautiful when served, they can be a little unwieldy on the plate.  I think I'll slice the zucchini into thin rounds rather than ribbons next time to make it easier on everyone, but if you like the ribbons, just make sure to serve with a knife.

Zucchini Ribbon Salad with Feta and Oregano


2 medium zucchini, washed and ends trimmed
2 tsp roughly chopped fresh oregano
1/4 cup feta, crumbled (or more to taste)
Juice of one lemon
6-9 Tbl olive oil (depending on how lemony you like your dressing!)
Salt and pepper

Using a mandoline (using the 1/8" setting) or a a very sharp knife, cut your zucchini lengthwise (if cutting ribbons) or into very thin rounds.  Lay in a deep platter or serving dish.  Sprinkle with the oregano and feta. 

In a small bowl, whisk together the lemon juice and salt and pepper to taste.  Whisk in 6 tablespoons of olive oil and taste.  If the vinaigrette is too lemony, add a little more olive oil until the flavor is how you'd like it. 

Pour the vinaigrette over the zucchini about 10 minutes before serving.


 Subscribe to free updates from The World in My Kitchen


Read more...

Monday, August 29, 2011

Kartoffelroulade, or Potato Roulade [Secret Recipe Club]


I have joined a club, a secret club. What kind of club, you ask, did I join that would warrant an announcement here?  Why, a cooking club, of course!  I joined The Secret Recipe Club last month, and am so glad I did.  Here's the rundown: Every month over 150 bloggers are assigned another blog to cook from.  We can cook any recipe on that blog.  The only rule is that we keep it a secret until reveal day--no one knows who has whom.  As of the posting time here, I still don't know who had my blog...I can't wait to see!

Secret Recipe Club

Anyway, I had Heidi's verden, which translates from Danish to "Heidi's World."  Heidi's blog was a perfect match for me--it's even written in Danish, so I had to use Google Translate to read her posts.  I love food from around the world and enjoy learning other languages, so I was excited to try something out that seemed particularly Danish.  I looked around her blog and finally settled on the Kartoffelroulade, or Potato Roulade (Roll). 

We served this with grilled burgers.  I made some minor changes to her recipe and have listed the quantities in American measurements here, but I kept the spirit of the recipe.  My husband and I really enjoyed this, although it does take some work to make.  She suggests grilling it, which I did on an indoor stovetop grill, but I may just try frying it up in a pan next time.  This makes 8 servings as a side, but I could imagine adding a little meat in there and serving it as a main course.  Thanks, Heidi, for this great recipe!

Kartoffelroulade (Potato Roulade)
from Heidi's verdern

2.2 pounds russet potato (about 5 medium potatoes), coarsely shredded
4 egg yolks
2 cups grated cheese (I used 1 cup sharp cheddar and 1 cup monterey jack.)
2 cloves garlic, minced
Salt and Pepper, to taste

Filling:
2 cups frozen or fresh (leaves blanched) spinach, chopped
1 block cream cheese
2 roasted red peppers

Mix the potato, egg yolks, cheese, garlic and salt and pepper in a large bowl. Cover a cookie sheet or roasting pan with parchment paper. Spread the potato mixture in a square shape on the parchment paper, pressing firmly all around. Bake in a 430 degree F oven for about 30 minutes, or until the potato sheet is cooked through and lightly browned. Remove from the oven and cool.

Once the potatoes are cooled, spread the cream cheese all over the potatoes. Spread the spinach on top and then sprinkle the red peppers on top of the spinach. Using the parchment paper to help you, roll the potato tightly into a spiral. Wrap in plastic wrap and refrigerate until you are ready to use. (Refrigerating it for a couple of hours or up to a day will help in slicing it later.)

When ready to serve, slice the roll into 1-to-2-inch slices. Spray a hot grill with olive oil or cooking spray and grill on each side until grill marks show, about 5 minutes on each side. Serve.


 Subscribe to free updates from The World in My Kitchen


Read more...

Monday, July 11, 2011

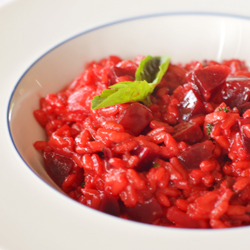
Beet Risotto: Kid and Adult Friendly!


If you were to ask my five-year-old daughter what her favorite vegetable is, she would respond with "Beets."  Beets for a five year old???  Yes, my daughter loves all of the "strange" vegetables that kids don't normally like: beets, asparagus, Brussels sprouts, okra.  You name a vegetable, she'll like it.  (Although strangely enough, she is middling on potatoes.)


So when we got beets a couple of weeks ago from our CSA, she did a happy dance.  She's happy to eat them roasted and plain or in a salad, but I wanted something a little different.  And then I stumbled across this recipe on Tastespotting.  The vibrant color mesmerized me, and when I was able to shake the stupor off, I realized that I had every ingredient I needed already in my kitchen!  It's an incredibly easy recipe, and my daughter oohed and aahed over the brilliant ruby color.  This is one way to get your kids to eat their veggies and enjoy them for yourself too!

I halved the recipe since it was only my daughter and I, and there wasn't a morsel left.  (The recipe below is the original amount.)  I also roasted the beets a couple of days before, which saved a ton of time when it came to making the risotto.

Red Beet Risotto
from bella eats


3/4 lbs beets (1 small bunch)
Olive oil

6-7 cups chicken stock
2 Tbl extra virgin olive oil
1/2 cup onion, finely chopped
1 1/2 cups arborio rice
2 garlic cloves, minced
1/2 cup white wine
Salt
Pepper
1/2 cup Parmesan cheese, grated
2 Tbl flat-leaf parsley, finely chopped

Roasting the beets:
Preheat the oven to 400 degrees F.  Place the beets in a small baking dish and lightly drizzle with olive oil.  Roll the beets around until they are completely coated in oil.  Cover tightly with foil.  Roast for about 20 minutes or until they are easily pierced with a fork.  Remove from the oven and cool completely.  Peel the beets--the skins should slide off easily.  Dice.

Making the risotto:
Place the chicken stock in a saucepan and bring to a simmer.  Reduce the heat to low.

In a large, heavy-bottomed pan, heat the 2 tablespoons of oil over medium heat.  Add the onions and stir occasionally until the onion soften, about 3 minutes.  Add the rice and garlic, stirring constantly until the rice is completely covered in oil and starts to crackle, about 3 minutes.

Add the wine and stir constantly until the wine has been almost completely absorbed.  Add a ladleful of stock and continue to stir until it has been almost completely absorbed.  Add another ladleful, and continue doing this for about 10 minutes.

Stir in the diced beets.  Add more stock, and continue as before for another 10-15 minutes or until the rice is finished.  The rice should not be mushy, but should also not be hard in the middle.  When the rice is finished, add the Parmesan cheese and parsley.  Season with salt and pepper.  The rice should be creamy--if not, add another ladleful of stock.

Serve hot.
 Subscribe to free updates from The World in My Kitchen


Read more...

Thursday, June 2, 2011

Crockpot French Onion Soup


As I mentioned in my last post, all of my posts this week will be French--today is French Onion Soup!  I love French Onion Soup, but as a busy mom with a full-time job, I just don't have the time to stand over a pot caramelizing onions for hours.  So what do I turn to?  My trusty crockpot, of course!  I use my crockpot a lot in the winter because, obviously, it makes great soups and stews.  It's also great in the summer when you don't want to turn on the oven and heat the house even more.  French Onion Soup is great in the winter or the summer--in the winter, I pair it with a grilled cheese, but in the summer a nice light salad does the trick.

I like to make cheese crisps to place on top of the soup instead of melting the cheese on the bowl under a broiler.  All you have to do is slice some French bread, top it with a pile of finely shredded gruyere or other Swiss cheese, and place it under the broiler until the cheese is all melty and starting to brown.  Ladle the soup into the bowls and top with the cheese crisps.  Voilà--a simple and very French meal!

Crockpot French Onion Soup
Adapted from Not My Mother's Slow Cooker Recipes


6 large yellow onions, peeled and sliced thinly
3 Tbl olive oil
1 Tbl bouquet garni, wrapped in cheesecloth
1 14-oz can chicken broth (or equivalent of homemade stock)
2-3 14-oz cans beef broth (or equivalent of homemade stock)
2 Tbl marsala

Sliced french bread
Gruyere cheese, finely grated

Turn your crockpot on to high.  Place the onions in the crockpot and toss them with the olive oil.  Lay the bouquet garni under some of the onions.  Cover and cook for about 8-10 hours or until the onions are caramelized, but not burnt.

Add the broths and marsala and cook for another 20 minutes or until the soup is hot.  In the meantime, pile some of the cheese on each piece of bread and place them on a baking sheet.  Place the baking sheet under the broiler for a couple of minutes until the cheese is melted and starting to turn brown.  Remove from the broiler and set aside.

Ladle the soup into bowls and top with cheese crisps.

 Subscribe to free updates from The World in My Kitchen


Read more...

Wednesday, May 18, 2011

Asparagus and Leek Quiche


Mother's Day was an extra special day this year.  Besides the fact that we celebrated my son's first birthday and baptism that day, we also had our mothers in town to celebrate.  I wanted to make something special to celebrate all of the love, but with the birthday and baptism, I just didn't have as much time as I would have liked to make an elaborate meal.  I settled on brunch and made two quiches (a Quiche Lorraine and this Asparagus and Leek Quiche), Cinnamon Sugar Pull-Apart Bread and a Tossed Strawberry Salad.  I prepped everything for the quiches and salad the night before and baked the bread.  All I had to do on the morning of Mother's Day/birthday celebration/baptism was throw the quiches together, bake them while I was getting ready, and then present everything at brunch after church.  Phew...I'm still tired!  ;-)


The meal was a lot of work, but not because of this quiche--it came together pretty quickly.  The presentation was lovely and the taste and texture buttery.  I wish I could say that I had made my own crust, but I wimped out and bought a store-made one.  I made up for that with local asparagus, eggs, cream, and bacon.  The presentation is stunning and makes it a great potluck dish.
Asparagus and Leek Quiche
Adapted ever so slightly from Stacey Snacks

1 pie/tart dough, homemade or premade
1 Tbl olive oil
1 bundle of asparagus, rinsed and ends trimmed
2 leeks, white and light green parts only, sliced into half-moons and rinsed thoroughly
3 strips bacon, cut into matchsticks and cooked
3 eggs
1 cup cream or half and half
Pinch of nutmeg
Salt and pepper, to taste
3/4 cup Gruyère cheese, shredded

Preheat your oven to 375 degrees F.  Cut a piece of parchment paper to fit the bottom of your tart pan.  Place the dough in the tart pan and press against the sides.  Trim or fold the excess over into the side of the pan.  Cover with foil and fill with pie weights (or uncooked rice).  Blind bake the crust for 12 minutes.  Remove from oven and set aside to cool.

Set aside enough asparagus to decorate the top of your quiche.  Cut the rest into 1-inch lengths.  Saute the asparagus pieces (not the decorative pieces) with the leeks over medium heat until the leeks start to soften, about 5 minutes.  Set aside.

In a large mixing bowl, beat together the eggs, cream, nutmeg, salt and pepper.  Add the bacon and cheese and mix well.

Spread the asparagus pieces and leeks on the bottom of your tart crust.  Pour the egg mixture over the vegetables.  Decorate the top with the rest of the asparagus.

Place the tart pan on a baking sheet and bake for 30 minutes or until the top starts to brown and puff up.  Serve warm or at room temperature.


 Subscribe to free updates from The World in My Kitchen


Read more...

Wednesday, May 4, 2011

Strawberry Tossed Salad

This is all that was left of a giant bowl of salad after a recent potluck...
Before I moved to Kentucky, I went to grad school in North Carolina.  While there, I made lots of amazing friends, and one in particular loved to cook.  She always brought the most amazing goodies to gatherings, but her Strawberry Tossed Salad was my hands-down favorite.  It's fresh and sweet and crunchy and just plain ol' good at the same time.  And Lara was generous enough to share the recipe with me before I moved here.  This is extremely lucky for me since every spring I start dreaming about this salad...  :-)  Go make it yourself before strawberries are out of season!

(Lara recently started her own food, culture and art blog over at Durham Food & Art, so go check her out!)  
Strawberry Tossed Salad
Serves a crowd

Dressing:
1/2 cup olive oil
1/3 cup red wine vinegar
1/4 tsp salt
1/3 cup sugar
1 clove garlic, minced
1/4 tsp paprika

Salad:
12 cups greens of choice (I like fresh spinach--it holds up well to the dressing.)
2 1/2 cups sliced strawberries
1 cup monterey jack cheese
1 cup honey roasted cashews or sugared pecans

Combine the dressing ingredients in a small bowl and whisk or in a jar with a lid and shake.  Let sit for at least an hour, but don't refrigerate it or the olive oil with harden.

When ready to serve, toss all of the ingredients in a large bowl.  (Don't make the salad until you are ready to serve.  The cheese, strawberries and nuts get soggy fast.) 
 Subscribe to free updates from The World in My Kitchen


Read more...

Thursday, April 21, 2011

Charcuterie Plate (and Wine, Of Course!)


Today I'm not going to share a recipe, but more of a method for a quick and delicious meal.  This is an extremely busy time for both me and my husband.  We both work at a college, and this is the time of year when papers are due, students are panicked about summer plans, and grades are looming.  Yet this is also the prettiest time of year here in Kentucky (at least in my humble opinion).  The weather starts to turn nice, and we all want to spend time outside--not in the classroom, not in an office, and definitely not in the kitchen (especially when you have to work longer days because of the looming deadlines!)

And this is where my oh-so-imaginative (haha!) technique comes in.  Put out a selection of meats, cheeses, spreads, breads, veggies, and fruit out and let everyone dig in!  Our favorites include one to two meats (salami, sopressata, prosciutto, serrano ham, etc.), two to three cheeses (a combination of soft and hard cheese is best), hummus, and olives.


After a long day at work, it's awfully nice to lay out the already prepared ingredients, pour a glass of wine, and sit out under our newly budding maple tree.  That's what I call an oasis in the midst of end-of-year chaos!

 Subscribe to free updates from The World in My Kitchen


Read more...

Monday, April 11, 2011

Refried Black Beans and Tostadas

I can't believe that I don't post more about Mexican food. It's one of my favorites, and since I grew up in Southern California, I cook a lot of it at home. I guess I haven't thought of it as special enough to post here because it's an "everyday" kind of food, but given that I cook mostly "everyday" kinds of foods and that I'd like to start posting more "everyday" foods, I'll start with the tostada.  (Although I will be posting a more complicated recipe--tamales--later this week, so stay tuned!)

Tostadas are basically Mexican open-faced tacos. You can use whatever toppings you have on hand, but my standard toppings include beans and/or meat, cheese, lettuce, tomatoes, onions, sour cream salsa, and avocados or guacamole. Feel free to be creative! Kids love this because it can all be assembled at the table--just put all of the ingredients into separate bowls and pass around. My daughter can pick and choose what she likes and loves that she gets to eat this meal with her hands!

Refried Black Beans
Makes enough for about 6 tostadas

2 cups freshly cooked black beans (or 1 15-oz can)
1 Tbl olive oil
1/2 medium onion, finely chopped
4 cloves garlic, minced
1 tsp ground coriander
1/2 tsp ground cumin
1/2-1 cup chicken, beef or vegetable broth
1 Tbl (or more to taste) lime juice (Lemon juice is fine too.)
2 Tbl cilantro, chopped
Salt and pepper, to taste

Heat the oil in a skillet over medium-high heat. Add the onions and cook until starting to brown lightly. Add the garlic and cook for about 1 minute. Add the coriander and cumin and cook until fragrant, about 1 minute. Add the beans and about 1/2 cup of the broth and lower the heat to medium. Smash about half of the beans with a potato masher. Cook for a few minutes until the beans start to thicken. Add more broth if the beans get too dry. Add the lime juice, cilantro and season with salt and pepper to taste. Serve hot.
Black Bean Tostadas

6 corn tortillas
vegetable oil

Toppings:
Refried Black Beans
Pepper jack cheese, shredded
Romaine lettuce, chopped
Tomatoes, finely chopped
Onions, minced
Sour Cream
Salsa
Avocados, chopped or guacamole

Heat about 1/2 inch of oil in a small skillet. Using tongs, place a tortilla in the oil. It should bubble all around. When the tortilla starts to stiffen, turn over. Remove to a paper towel when it it starts to brown. Repeat with the rest of the tortillas. The tostada shells should be crunchy all the way through. If it is not, you have not left the tortilla in the oil long enough.

Once the shells have cooled, pile them with your toppings. Enjoy!
Subscribe to free updates from Mindy's Mouthful


Read more...

Wednesday, March 16, 2011

Shaker Sweet Potato Gratin


My husband and I celebrated our 7th anniversary back in January. We typically splurge on our anniversary meals, but we decided to stick close to home this year. Shaker Village of Pleasant Hill, the country's largest restored Shaker community, is just about 20 minutes from our home. It's a great place to discover history and take walks, but it also has a wonderful restaurant. Typically, they serve meals in the Inn at Shaker Village, but during the winter months, they serve dinner in the Winter Kitchen, a cozy cellar with a fireplace. The fare is simple, yet delicious, and the chefs really spotlight the ingredients (which in the summer are harvested from their own garden). One of the side dishes I had that night was a sweet potato gratin--I loved it so much that I wrote to Shaker Village and asked if they would share the recipe, and they were kind enough to send it to me.

This is simple to make, but only make what you need; the leftovers do not store well.

Shaker Sweet Potato Gratin
adapted from Shaker Village of Pleasant Hill's Winter Kitchen
Serves 6 as a side dish


1 large sweet potato, peeled and thinly sliced (Use a mandoline if you have one--you want the slices to be as thin as possible.)
1 cup heavy cream
1/8 tsp dried rosemary
1/8 tsp dried sage
1/8 tsp garlic powder
1/2 cup parmesan cheese, freshly grated
1/2 cup panko bread crumbs
1 Tbl butter

Heat the heavy cream, rosemary, sage and garlic powder in a small saucepan and simmer for about 10 minutes. Do not boil.

Preheat the oven to 450 degrees F. Grease a small casserole dish with butter. (I use an 11" x 7" glass dish.) Cover the bottom of the dish with the potatoes. Spoon over a couple of tablespoons of the cream. Sprinkle with a little bit of parmesan cheese. Continue this process until the dish is full. Pour any remaining cream over the top and sprinkle on any leftover cheese.

Melt the butter in a microwave in a small microwave-safe bowl. Add the bread crumbs and toss. Sprinkle over the casserole. Bake in the oven for about 45 minutes or until the potatoes are completely softened. If the bread crumbs haven't browned by the time the potatoes are done, place under a broiler until they are browned.

Serve hot.

Subscribe to free updates from Mindy's Mouthful


Read more...

Thursday, February 24, 2011

Tartines, or Fancy Sandwiches


Before I tell you about these tantalizing tartines, I wanted to let you know to keep an eye out later this week for a giveaway! Yes, I'm hosting my first giveaway--yahoo! CSN Stores approached me earlier this week and offered me to review a product or give something to you, and although I'd love to add a new item to my kitchen, I'm going to pass the luck on to you, my loyal readers! CSN Stores has over 200 online stores where you can find anything you need whether it be office desks, fitness equipment, or even awesome cookware! I'll tell you more about it soon, but I wanted to give you a head's up. :-)

On to the tartines! I was introduced to lovely tartines when I lived in France. The French have such a fancy name that rolls off the tongue and elicits images of elegant food. Really, they're just open-faced sandwiches, but the French do it with such flair. Open-faced sandwiches in the U.S., at least in my experience, are often piled high with meat and smothered in gravy or sauce. Not so in France--they are delicate sandwiches, usually made with simple ingredients that meld together perfectly.

On Valentine's Day we recreated our favorite tartines from one of our favorite restaurants in Strasbourg, L'Épicerie. It is located such a quaint little space where you really get to know your neighbors (or at least their elbows!) and is combined with affordable (which is hard to find in Europe!) and delicious fare. My daughter would always order the smoked salmon while I would order the goat cheese tartine. Ahhhh...the memories!

These sandwiches are great as a meal if paired with a salad or would be great cut up into bite-sized pieces and served as an hors d'oeuvre. Feel free to be creative with your toppings--the French certainly would!

Smoked Salmon Tartine with Dill, Capers and Crème Fraiche


1 slice of rustic bread, preferably a boule-shaped loaf (I used homemade wheat.)
Crème fraiche
1 slice of smoked salmon
1 tsp fresh dill, chopped
1 tsp capers, rinsed

Spread a little bit of crème fraiche onto the bread. (A little goes a long way.) Lay the salmon on the bread and sprinkle with the dill and capers. Enjoy!


Goat Cheese Tartine with Honey and Almonds

1 slice of rustic bread, preferably a boule-shaped loaf (I used homemade wheat.)
1-2 Tbl goat cheese
1 tsp honey (or more to taste)
1 tsp sliced toasted almonds (or more to taste)

Spread the goat cheese onto the bread. Drizzle the honey over the goat cheese and sprinkle with almonds. Enjoy!

Subscribe to free updates from Mindy's Mouthful


Read more...
LinkWithin Related Stories Widget for Blogs

  © Blogger templates The Professional Template by Ourblogtemplates.com 2008

Back to TOP  

Google Analytics Alternative